
I wanted to use the qualities of Adele’s ‘Forest’ drawing to create otherworldly forest in the final painting. (I mentioned in “Fire in Modern and Contemporary Artworks” post that the forest was reminiscent of the one sisters’ family was living nearby)


Adele started her work without having any intentions of what it should represent. Like I mentioned in the blog post Dragon and Owls in The Forest, I taught the sisters how to ‘draw’ with paint using a pipette, and the girls spontaneously showed me how to manipulate paint further by blowing air through a straw.
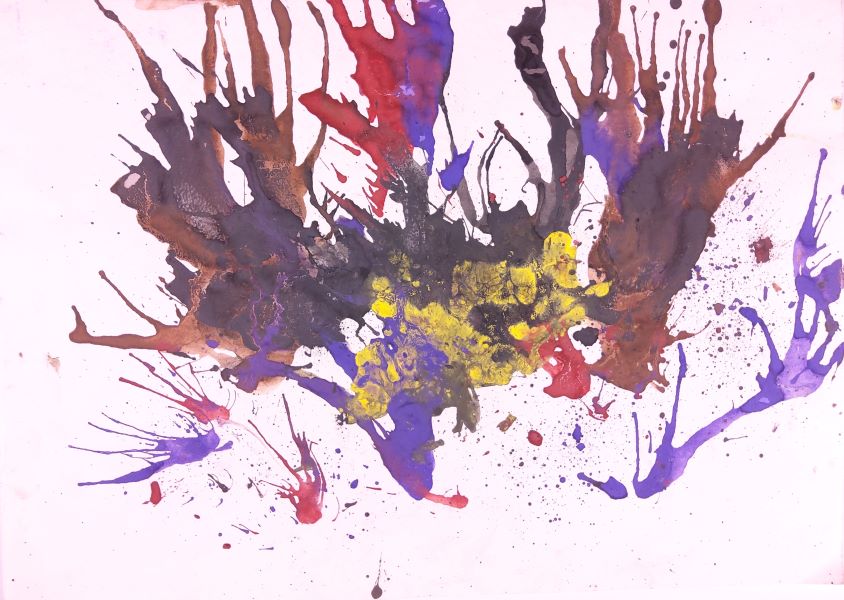
The result did not seem like the trees we are used to seeing in nature but their peculiar appearance made them magical and original. Adele’s forest appears somewhat grusesome, which was a well desired characteristic since in the fairy tale created by the sister the dragon got hurt in the forest and needed to be rescued.
While using Adele’s drawing as a reference, I worked on creating the forest composition for the final portrait painting. I worked with charcoal on paper at the beginning. I made numerous drawings in order to get a satisfying result. Below you can see images of the first and the last sketches. (Here you can view a video showing all the sketches and photographs of the making process).


Only when I was satisfied with the composition, I moved on to painting. I worked with acrylics. (We agreed with the family that only the main figures will be painted in oils and the rest of the painting will be in acrylics.) After I paintined the background in light grey, I mixed up all the colours needed for the trees – black, brown, red and purple – the same ones as in Adele’s drawing. The colours were diluted with water to create double-cream consistency so that it could flow easily using this specific technique. I originally intended to use the same technique as Adele did for her drawing. However, after few expriments I realised that blowing paint with a straw creates overly unpredictable results. Therefore, in order to have more control, I decided to ‘draw’ the peculiarly shaped trunks and branches using pipettes.
Firstly, I painted the trees that were furthest in the background. I let them dry, then covered them with smoke/fog (light grey, very diluted with water), and then painted the foreground trees.

If you would look again at the ‘Forest’ drawing by Adele, you would see I the middle an interesting yellow and black texture. It turned out that way because the yellow paint was much thicker than the black one (we were using gouache which can be diluted with water). While Adele was playing with paint by adding more and more colours, the thick yellow paint got covered with black. However, when Adele blew air with a straw into the paint puddle, the yellow started to come through in interesting texture. Since I never used a straw for painting, this texture was a new discovery for me as well. Looking at the result, together with Adele we decided that the yellow texture could be a flowerbed on the forest ground, which also worked well for the composition in the final portrait painting.

As you can imagine, blowing air into a puddle of paint creates unpredictable results. After some refection, I decided that I like it that it appears flat closer to the foreground, and it would be nice to see it shrinking with perspective as it recedes into the background. I used the same background light-grey colour to paint over the excess flowerbed texture. (If you have your acrylic paint mixture in plastic cups covered with clingfilm, it won’t dry out for days; even for weeks if you check it once in a while and add more water.)

At this point, once the paint was dry, I added surrounding grass as well as fire on a few places of trees using the straw technique.

Then in between the trees I drew the characters from other fairy tales – fox, wolf, witch and evil spirit. Read more about the backstory of those characters in this blog post.
Then, using charcoal and orange pencil, I created marks and scribbles resembling smoke and fire. Read the backstory of fire elements in this blog post.
Lastly, I sprayed everything with fixing spray to seal charcoal and pencil marks (if you are on a budget, regular hair spray works fine). To my surprise, this made the acrylic colours, which inherently are pale once dry, become almost as vivid as that of oil paints. It was very fortunate unexpected turn as I was planning to use varnish so that acrylic parts would not appear too pale in comparison to oils. (I mentioned earlier that only the main figure were painted in oils while the rest of the painting was in acrylics and other materials.)
For the artists out there, give yourself time to reflect on the order of when each part should be painted/drawn. Mistakes and accidents happen almost with every single step so it is good to think forward about what you could mess up and what you would need to do to fix it. The best way to think and reflect is to journal. The time spent on journaling will save a lot of time during making.
Pingback: Painting Process of Adele and Gabrielis The Owls | Neverland Portrait "The Burning Forest" | Neverland Portraits